Style Transfer Web App
Overview
This end-to-end project showcases how to design and tune a deep learning computer vision model to deploy it in a browser using TensorFlow JS. Since the model must run on the client side, it is quite resource constraint.
It explores how to handle these constraints on the example task of Neural Style Transfer.
You can try the app yourself on the NeuralCeption website. For details on the steps, see the three posts Post 1, Post 2, and Post 3 on NeuralCeption.
Neural Style Transfer implementations
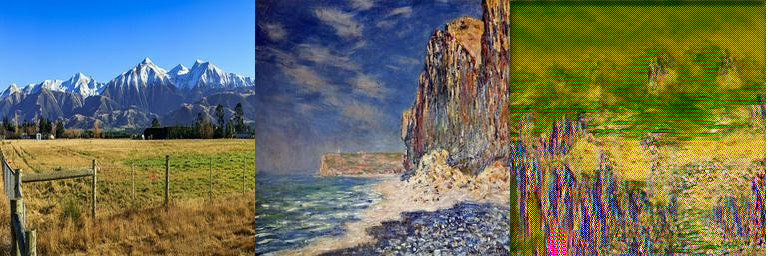
In style transfer we try to generate an image with a content in the style of a different image, see example below. The figure shows an example of a photograph on the left, a style image from which the style is picked up, and the resulting photograph rendered in the style of the second image.
Style transfer can be achived by using a tailored loss function during training, as done in A Neural Algorithm of Artistic Style. However, this approach comes with computationally expensive inference phase.
Johnson et al. moved the learning of the style entirely into the training phase, which reduces the inference phase to a single forward pass. The model is trained with a perceptual loss instead of a pixel loss. Here, the output of the transformation network is passed into a pre-trained VGG16 network. This network acts as the loss network since activations are extracted at different layers and summed up to a loss.
Train and run models yourself
To train models yourself, you can clone this repository and follow the instructions below.
Setup
To get started, add content images to the folder data/content. You can also change the content image path in the configuration file. Next, add style images to the data/style folder. For the transformationNet model the authors of the paper trained on the COCO dataset (~80,000 images) for epochs with a batchsize of .
One style image is used for training.
The examples in this repository are made with the kaggle art competition dataset.
How to use
Three files are important if you want to generate images: configuration.yaml, train.py, and run.py. In the following the steps are explained.
Train models
- Add images to the folder
data. Content images and the selected style image are used by the model to learn weights. Currently, only.jpgimages of the same size are supported. - Check the settings in
configuration.yaml. Whenever there is a conflict between information in the config and arguments, the argument is taken. - Train the model by calling
train.py. The trained models are saved in the foldermodels.
For each training, the model is saved in the path which is set in the configuration.yaml and the loss during training is written to a log file in the folder models/<model_name>/<model_name>.
Once training is complete you find model weights, the loss in a log file, and a plot of the loss in the folder models/<model_name>/.
You can continue with training from previous weights by providing the weights as argument. Then, epochs means the total epochs, including the ones already trained.
Available models
Currently, four models are supported.
| Model name | Parameters total | Trainable parameters | Comment |
|---|---|---|---|
| TransformNet | 1,682,435 | 1,679,235 | From paper, deconvs |
| TransformNetConvs | 1,682,435 | 1,679,235 | Bilinear upsampling with convs |
| MediumNet | 201,475 | 200,835 | Bilinear upsampling with convs |
| TinyNet | 53,059 | 52,803 | Bilinear upsampling with convs |
The first one TransformNet is an implementation of the model from the paper. However, it uses deconvolutions for upsampling and in tests on the kaggle dataset this model lead to checkerboard artifacts. That is why the deconvolutions are replaced by bilinear upsampling and zero padding, followed by a direct convolution in TransformNetConvs. Additonally, there are two smaller networks, both of which use the same upsampling and convolution.
Use trained models for style transfer
To use trained models for style transfer of content images, run run.py. You can either choose a specific model by its weights with the argument --model, or choose all models in a model folder with --allModels. The second required argument is the content image --image which has to be located in the content image path. Select the name without the file extension.
Project links
References
- Johnson et al. Perceptual Losses for Real-Time Style Transfer and Super-Resolution. 2016 https://arxiv.org/abs/1603.08155
Loading comments...
Loading user status...